 |  | |
| | ||
| |
Router Table Depot Archive Page
Wednesday, October 29, 2008
If you have been browsing around your local home improvement store or craft shop then you have probably noticed some great woodworking plans. Problem is, there is so many to choose from, how do you decide what to do Well you can narrow down your choices if you decide what season you would like your project to represent. Here are a few suggestions of projects that you may want to try your hand at for the different seasons. 1. Flower holders and PlantersAs soon as spring rolls around most of us seem to develop "spring fever". We're anxious to get outdoors and start working on those gardens.. So why not go find yourself a few neat plans to build some flower holders and planters. 2. Outdoor summer décor It's nice to have all the landscaping done, and the garden furniture in place. If you have some spare time on your hands, now is the ideal time to take on one of those projects you have been thinking about all winter. Like the fort you promised to build the boys, or maybe the playhouse your daughter has been begging for. Better still do both. Visit your local craft store and just review all of woodworking patterns they have to offer for both the forts and the playhouse. Choose one that's going to fit your needs. 3. Garden Décor If you look around some of the local improvement stores you will see tons of whimsical garden decorations. Problem is everyone in the neighborhood has the same thing. Why not be unique. Start a project and make your decorations, instead of having the usual plastic or cement ones.. Be creative and original. Gnomes made from wood, or even a few woodland animals would be perfect.4. Fall Decor Before you know it the leaves are hitting the ground, and those summer breezes that were once warm and inviting have become a bit nippy. So why not perk up your landscaping with some fall décor. After all a nice big fat turkey (a wood one of course) sitting along side your fence would create some interest. Then there's Halloween where you can just let your imagination run a bit wild here.5. Fall is the perfect time to go ahead and build that compost box you have been talking about. Especially now that you have all the fallen leaves to find a home for. You are going to want to find woodworking plans that will apply to the size of the area you have available. Winter Woes6. Now that the snow has presented itself, you are back to cleaning that mucky mess at the back entrance, and of course tripping over the boots. You have decided that something has to be done about this. Great! Go grab yourself some plans and start building that boot rack that is going to solve all these problems. 7. Have you ever admired those lifelike reindeer standing out in the snow? Yes the ones made from wood. What an ideal project to fulfill two ideas at once. The reindeer add just a bit of color and interest during the winter months. So you have some nice outdoor winter décor. Then at Christmas just tie a big red bow around their necks and there's part of your Christmas decorating all taken care of. No matter which of these projects you decide to take on do yourself a favor. Go and check out all of the woodworking plans at your favorite store. They are all simple projects but still require some step by step direction. Ryan Henderson is the founder of MyShedPlans.com - http://www.MyShedPlans.com As featured In Woodcraft, Log Homes Illustrated & Popular Mechanics Magazines, MyShedPlans provides the ultimate resource for woodworking enthusiasts and craftsmen. Discover the easiest step-by-step way to build beautiful wooden sheds & woodworking projects in the next 5 minutes! Jam packed with over 12,000 shed plans, blueprints, illustrations and woodworking patterns from everything ranging from small clock houses to large storage and garden sheds. P.S: Offer: Visit MyShedPlans official site now and download woodworking plans now! Article Source: http://EzineArticles.com/?expert=Ryan_Henderson by: Router Table Depot 0 Comments
by
Ryan Henderson If you are just new to woodworking then do your homework first, and find out all the safety precautions you should be aware of before you start. Don't compromise the time and say it just takes common sense. We all make mistakes, and not being aware or taking the time to learn about safety in your work could be a very costly one. The dangers are twofold in that you can put your personal safety at risk, or at they very least make some irreparable mistakes to your project. Don't underestimate the damage that some of the smaller woodworking tools can do. If the instrument is sharp in any way ,it can cause a nasty cut or puncture. If it's a larger tool like a saw it can cause you to lose a limb. To prevent this you must always be alert. If you are overtired, not feeling well ,or have been drinking alcohol then don't work on your project ,and most importantly do not use your tools. Learn about the tools you will be using for your woodworking projects. Know what they are capable of. Be sure to always read the operating instructions as well as the safety instructions before you even attempt to operate it. If is a second hand item that you have purchased, then go on the internet to research it. Sometimes you can even contact the manufacturer and they will be happy to send you out the information. Sometimes people will remove the safety guards that are installed on the tools. This is a very dangerous practices. Those guards are there for your safety. Also keep your tools in good working order. Damaged tools can result in a fire by shorting out, or even causing electrical shock. Make sure your work area is large enough that you can work safely. Keep it clean. Leaving things scattered on the floor is a very easy way for you or someone else to trip. Make it a habit to unplug any of your electrical tools when unattended, especially if others have access to your work shop. Children are intrigued by tools and may be curious to try them. If you hair is long be sure to keep it tied back. It can easily get caught in one of your tools, or block your vision when you are working with a power tool. Additionally it's a good idea to remove jewelry that could get caught in your tools. Protective clothing is important as well, such as goggles, gloves and dust masks when working on any woodworking project. If you are working with loud tools, then perhaps use earplugs. Ventilation is very important. Not only for the dust, but for the fumes that are sometimes created from the finishing products. Not concentrating could lead to accidents, you could end up making the wrong cuts on your wood for example. Or using the wrong type of finishing product. This is frustrating when you have been working so hard on a woodworking project ,or invested so much money into materials. Many mishaps can be avoided in woodworking activities if you stick to the rules as well as use common sense. Ryan Henderson is the founder of MyShedPlans.com As featured In Woodcraft, Log Homes Illustrated & Popular Mechanics Magazines, MyShedPlans provides the ultimate resource for woodworking enthusiasts and craftsmen. Discover the easiest step-by-step way to build beautiful wooden sheds & woodworking projects in the next 5 minutes! Jam packed with over 12,000 shed plans, blueprints, illustrations and woodworking patterns from everything ranging from small clock houses to large storage and garden sheds. P.S: Offer: Visit MyShedPlans official site now and download free garden shed plans now! Article Source: http://EzineArticles.com/?expert=Ryan_Henderson http://EzineArticles.com/?Avoiding-the-Hidden-Dangers-During-Woodworking-Or-Shed-Building&id=1552218 by: Router Table Depot 0 Comments
Monday, October 20, 2008
Sometimes you just need to put your tools in an organized fashion or I cannot get anything done in the shop. Put your tools within easy reach by rolling this sturdy cabinet right up to your work area. When you're through, simply close and lock the doors. Then return the cabinet to its storage spot-it occupies only 2x2' of floor space. Closed cabinet measures approximately 24" wide by 24" deep by 66" tall (including casters). You can download this plan directly here Labels: Plans by: Router Table Depot 0 Comments
Sunday, October 19, 2008
 These machines combine the qualities of a 3-hp cabinet saws with contractor-style saws and run on 110 volts. You’ll find out if one belongs in your shop, and if so, which model to buy. Also, see why WOOD testers gave the Shop Fox W1748 Top Tool Approval. This tool review was featured in the November 2008 issue of WOOD. NOTE: This item is available as a downloadable PDF. To download, view, and print the article on your computer, you'll need Adobe Acrobat Reader. Click here for Step-By-Step Instructions on downloading a pdf. by: Router Table Depot 0 Comments
Friday, October 17, 2008
Creating your own products to sell online is definitely a Traditionally when you think of wooden items that are for sale, Target Audience Think of who your target audience is when thinking of a product Another idea to keep in mind is to do your research. Take the Think about this, table legs. Table legs that are handmade and Labels: General by: Router Table Depot 0 Comments
Thursday, October 16, 2008
Ok, so you have decided that you want a router table for your First, do your homework, a little research goes a long way. Second, know the features you are looking for. The features are Third. Know what size table you want. Router tables come in two Fourth. Make a budget, it sounds reasonable. Sometimes you will Lastly, and this might sound kind of weird, but if you can find Labels: Tables by: Router Table Depot 0 Comments
Wednesday, October 15, 2008
Buying a bench top router table today can be a little bit Even if they have all the features of a bigger table they use Another key problem with the features of the smaller tables is Miter track If you look at the tables today you can find an interesting At the bottom of the pile is the Skil 450. It is manufactured The Bosch 1181 table is loaded with features, which is great. The Super Bench from Router Table Depot has every feature that The Rousseau folding table is another feature rich table with a Rockler makes a nice design with wooden legs. However the top Putting all the tables side by side gives you a great Labels: Tables by: Router Table Depot 0 Comments
Tuesday, October 14, 2008
I get the question a lot lately about cutting dado’s and The problem you run into is that the project is longer than the Cutting the grooves is left best to two different tools. The Labels: General by: Router Table Depot 0 Comments
Monday, October 13, 2008
Whether you are looking to remodel your home or rebuild a brand For instance, if the contractor you hired is licensed, but You should also remember to check out your contractor’s license Another thing to remember when hiring a contractor is to Now once you have found out that your contractor has a license, Before you actually hire any contractor, you should interview When you are sure of your pick of contractors, you need to sign You should also make sure that you learn all you can about How can you know if your contractor is truly legit? Here are • Has a special offer only if you sign today
Labels: General by: Router Table Depot 0 Comments
Sunday, October 12, 2008
Have you ever dreamed of being handy in your own home? Have you To become one, you first need to have the right tools for the • Start with a simple project, e.g., a birdhouse. Do not • Once you have decided what project you will do, check out the • Once you have completed your first project, move on to the Aside from having the right tools, a good woodworker needs to
Labels: General by: Router Table Depot 0 Comments
Saturday, October 11, 2008
FESTOOL is a company based in Germany that produces power tools Among the power tools that have been manufactured by FESTOOL is Among the more popular in FESTOOL’s lineup of routers is the • Spindle brake that allows you to stop the bit in just 1-2 • Temperature control cut off mechanism, which turns off the • Constant speed routing, which means that the rotational speed Other features of the FESTOOL OF1400 EBQ Router include: • Snug-fit Barrel-grip handle surrounded by the trigger, • Patented removable power cord “Plug It” system. • Multi-purpose (plunge and plunge poles lock) knob. • Fence rail lock and twin levers to allow bushings and dust • Spindle lock button. • Easy to install and remove, “lung friendly” dust collection The FESTOOL OF1400 EBQ Router has generated favorable reviews Other members of the FESTOOL family of routers are the OF1010
Labels: routers by: Router Table Depot 0 Comments
Friday, October 10, 2008
Some families watch television, others like to play sports. But After you have a safety talk with your child about your Once you choose the project, you can then show your child which Another option for your younger children is to buy them a After finishing the creation of your project, the real fun When your project is fully complete, congratulate them! Make More woodworking articles here
by: Router Table Depot 0 Comments
Thursday, October 9, 2008
All the time you see different products that come out to help In the meantime, keeping the bits clean is probably one of the Sharpening I use the same system for cleaning as I do for sharpening. The Today So what exists out there today for the home user? Not much. I See more router bits here Labels: router bits by: Router Table Depot 0 Comments
Wednesday, October 8, 2008
Offering hand crafted children’s furniture online for sale is a terrific niche market. If you drill down a bit more you will find that you can offer items like tables and chairs sets, small bookcases and wall decorations. People love anything that is handcrafted and do not seem to mind spending money to make their kids rooms look great. Add the fact the children’s demographic is continuous, and you have a terrific market opportunity. Demand is strong for this market if you approach it with a good plan and a sensible mind. Pros and Cons Cons First of all, anything that is hand crafted involves significant time. If you plan on making the items yourself, it can involve an amazing amount of time. I started out in this business out of the passion of creating something special. I quickly learned that the time to make each unit actually ate away at my bottom line because of the time it took to make the units. If your items are painted you have to contend with sanding, priming, painting at least two coats, artwork and sealing the project. Any shortcuts you can make will help cut down on your assembly time. If I were to coach someone through this process today, I would recommend having someone cut your parts or even supply everything you need. Anything you can do in this capacity will save you time which means you save money. Pros Just about everything today is made overseas. Finding good quality craftsmanship with a personal flair is getting harder and harder. You can build up a great following if you can offer special made items. Younger children’s items like tables and chairs do especially well. Targeting the right crowd of buyers also helps you sell for a better price. The “walmart” price conscious buyer is not who you are really after. Goods on the very high end also do well offering a higher margin but less frequency of sales. Of course this all is a matter of research. We made the habit of using commercial artists that were just starting out and willing to work for reasonable items. We would offer to name a line of products using their name and that had some good selling appeal. Who would not like having their own furniture line? (it reminds me of giving a person a title instead of a raise, but it does work) Another technique that works well is outsourcing your parts after you develop a good feel for what is selling. There is nothing wrong with importing chairs or blank parts to help cut down your production time. Submit your own designs and many importers will build to your exact specifications. Finishing the product yourself using this technique can still be labeled with the handmade label. This is a powerful technique but you have to order parts in larger quantities to make it work best. If you are thinking about setting out to specialize in this field, it can be very rewarding. Knowing the obstacles before you get into is, can make the difference between staying in the market or moving on to something else. Ken Schulte is a contributing editor to http://www.routertabledepot.com as well as a coach for small business specializing in manufacturing. Article Source: http://EzineArticles.com/?expert=Ken_Schulte http://EzineArticles.com/?Handcrafted-Childrens-Furniture-for-Ecommerce&id=452345 by: Router Table Depot 0 Comments When you look at dovetail joints in a woodworking project you immediately think quality. The joint is tight, it looks fantastic. Getting the hang of cutting dovetails used to be the sign of a master craftsman. Now cutting dovetails has become easier with great new jigs and the help of plunge routers. Jigs Hand cutting Types Through dovetails are common in case construction such as cabinets and boxes. They are rarely concealed and are designed to be showed off. Ask any quality furniture salesman about the dovetail joint and they will immediately know what you’re talking about. Half-Blind dovetails are commonly used in drawer construction and are designed so that you do not see the end grain. They still provide a great amount of strength as well as quality. Full Blind dovetails are used where strength is required but without a visible joint. Fine cabinet or box work sometimes uses this method. Sliding dovetails are used to join two boards at right angles. These can give a lot of strength as well as glue area. They can be used for cabinet shelves, cabinet sides, drawer fronts to sides and partitions. They also can be used for drawer slides instead of using mechanical drawer slide kits that you purchase at home improvement stores. As you can see, learning to make this joint can give you many applications in the workshop. The time spent learning this technique can pay off by increasing the quality of your work. Ken Schulte is a contributing editor to http://www.routertabledepot.com as well as a coach for small business specializing in manufacturing. Article Source: http://EzineArticles.com/?expert=Ken_Schulte http://EzineArticles.com/?Dovetail-Joinery&id=474626 by: Router Table Depot 0 Comments
When you are looking for quality from the start with power tools and power tool accessories, you can go wrong with the Incra brand power tools. One of the best products on the market that Incra offers is the Incra router tables. These tables are a comprehensive solution for most of your wood working needs. Costing around $450.00, this amazing router table gives you the features of a router table fence, a box joint gig, and a dovetail jig. With all the accessories that come with Incra router tables, you can see the value. If you went and purchased all these extras, you would be paying a lot more than the original group price. It just makes good sense to go with Incra from the start.
Most people would perceive the Incra router tables as a piece of complicated equipment. The word "complex" seems more appropriate because this is a complex piece of equipment. The complexity will serve its purpose as you discover all the things and tasks that you can do with this table. Once you have deciphered the manual there are a plethora of things that you can do. The manual offers easy to follow the steps, but the table is so versatile, you have to learn each task independently. The main feature of the Incra router table is the positioner. If you are working with intricate cuts or grooves, the positioner will allow you to make accurate measurements and accurate markings to give your cut the quality of an expert. You can fine tune and adjust the positioner in three positions that allow for flexibility and accuracy. The positioner can be adjusted for gross adjustment, fine adjustment, or a locked position that will allow expert alignments. You can align the fence from 1/32" to .001" for those intricate operations. The Incra router tables also come with scales to help with those tough jobs. If you have jobs that contain dovetail joints or box joints then the steel rule is great for positioning the wood so that you have an even cut with no cracks or separations. The scales come with the tables and each is marked with for a specific size and type of joint and all scales are replaceable if they become damaged or lost. You can even adjust to out feed face for joints by sliding along the fence for joints that will hold and fit securely. Incra router tables are the most versatile tables on the market. Though you may be paying more than you expect for a router table, the extras and the accuracy makes this router table worth every penny. Its space saving design allows you to have more room in your workshop and more room for the equipment you really want there. The flexibility and all encompassing versatility of these router tables may even lead to you getting rid of a few pieces of equipment you might not need any more. All in all, it is one of the best router tables for the value on the market right now. Click here for more information on Router Tables and Router table accessories. Article Source: http://EzineArticles.com/?expert=Tony_Scorch http://EzineArticles.com/?Incra-Router-Tables-Will-Up-Your-Productivity-With-Speed-And-Accuracy&id=1197579 by: Router Table Depot 0 Comments
People who work with woodworking or fiberglass can be exposed to many serious health risks which involve the breathing in of dust and other microscopic or bigger debris. This is serious business. To breathe in any type of particles puts strain on your lungs and decreases your ability to breathe properly and to have proper cardiovascular health. The best thing to do to decrease your exposure to these dangerous materials is to install a dust collector on your power tools or have a dust collection ventilation system in your woodshop or work area. Without one you can put yourself up for some serious consequences.
Dust collection can be applied in several different kinds of venues around your woodshop. Dust collection apparatus can be secured to power tools such as a saw or sander where the dust is collected right when it occurs. Some dust collection apparatus consists of cheese cloth bags attached to your tools or there are custom built dust collectors that will either fit on your power tool or sets independently near the work area to suck up dust or minute matter that would otherwise get into your lungs and harm your health. No matter what you are doing in the workshop, you need to have some kind of dust collection device. Dust collection ventilation systems can be installed for the overall protection from dust for your entire workshop. Not only does these mammoth machines suck dust out of the air as you work, but you can sweep the sawdust and other material into the machine at designated ports around your shop. Just a quick sweep with a wide broom and your floor and air will be clean and safe. These larger dust collection machines are pricey, but if you are a commercial shop or if you have a large volume of dust accompanying your work, then this is a must for the serious wood working shop. If you have a small wood working shop and you want to go commercial and hire workers, then you, according to OSHA, have to upgrade your dust collection equipment. The health of your workers and the prosperity of your business are pertinent to your success as a work shop owner. With the proper dust collection equipment even your insurance will go down if you provide insurance to your workers. It is a win-win situation to have this equipment installed and operating while your wood shop is in business. Without it you could set yourself up for legal problems and health problems down the road. No matter if you are a weekend wood working warrior or a wood working business, you have to have dust collectors in place to save your health and even the environment. Dust from your wood shop could contaminate the local air with in particulate matter that will add to the dust from the road and neighborhood to contaminate the air and make you and your neighbors less healthy than you should be. At least wear a dust mask when working on wood and when you can afford it, purchase dust collectors. Click here for more information on Dust Collection and Router table accessories. Article Source: http://EzineArticles.com/?expert=Tony_Scorch http://EzineArticles.com/?Dust-Collectors-For-You-And-Your-Employees-Health&id=1197588 by: Router Table Depot 0 Comments
Tuesday, October 7, 2008
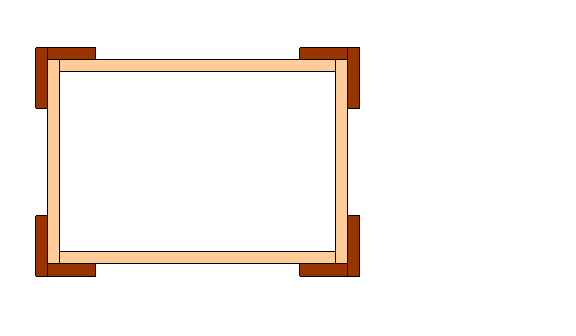
Building Leg Kits Building legs and stands for router tables are somewhat simple. In fact, I am sure you already have something in mind. This is a very simple design base on a metal stand. One of the advantages of building your own stand out of wood, is that it is your design. You can build it out of any type wood you have on hand. Even plywood and MDF make a very good stand. The goal is stability. I find that a “L” shaped Leg provides the cornerstone of a stable design.
Sides Cutting the sides is easy. Choose your length and cut two for the top and two for the bottom. Repeat for the widths. Install them as shown.
Use Wood screws to attach and you can use a countersunk hole to make the assembly flush.
In the end the stand should look like this.
by: Router Table Depot 0 Comments
Sunday, October 5, 2008
|
Previous Posts
Archives
|


| Copyright © 2008 KNV Enterprises LLC. All Rights Reserved. |